Imagine your digital product business is ready to go global. Whether you're selling software licenses or premium content, moving beyond your first few markets brings a new set of architectural hurdles. You need to calculate VAT for customers in Berlin, support Japanese Yen (JPY) for a download in Tokyo, and seamlessly manage a mix of one-time purchases and recurring subscriptions, all while maintaining a branded, embedded checkout experience that keeps customers on your page.
For developers looking to build a flexible payment flow with Stripe, there's an integration pattern that should be your default starting point. The Checkout Sessions API supports Stripe’s embeddable UI Elements so you can build a commerce layer that offloads global complexity to Stripe on the backend while maintaining full control over your branded checkout UX.
In this post, we’ll explore how to implement this pattern to design a future-proof payment flow. One where complex global features like Adaptive Pricing can be enabled out-of-the-box with a single API parameter rather than a total code rewrite.
Understanding Stripe’s payment abstractions
First, let’s look at how Stripe organizes its API objects. Stripe’s architecture is built on two distinct layers of abstraction that interoperate to manage the payment lifecycle:
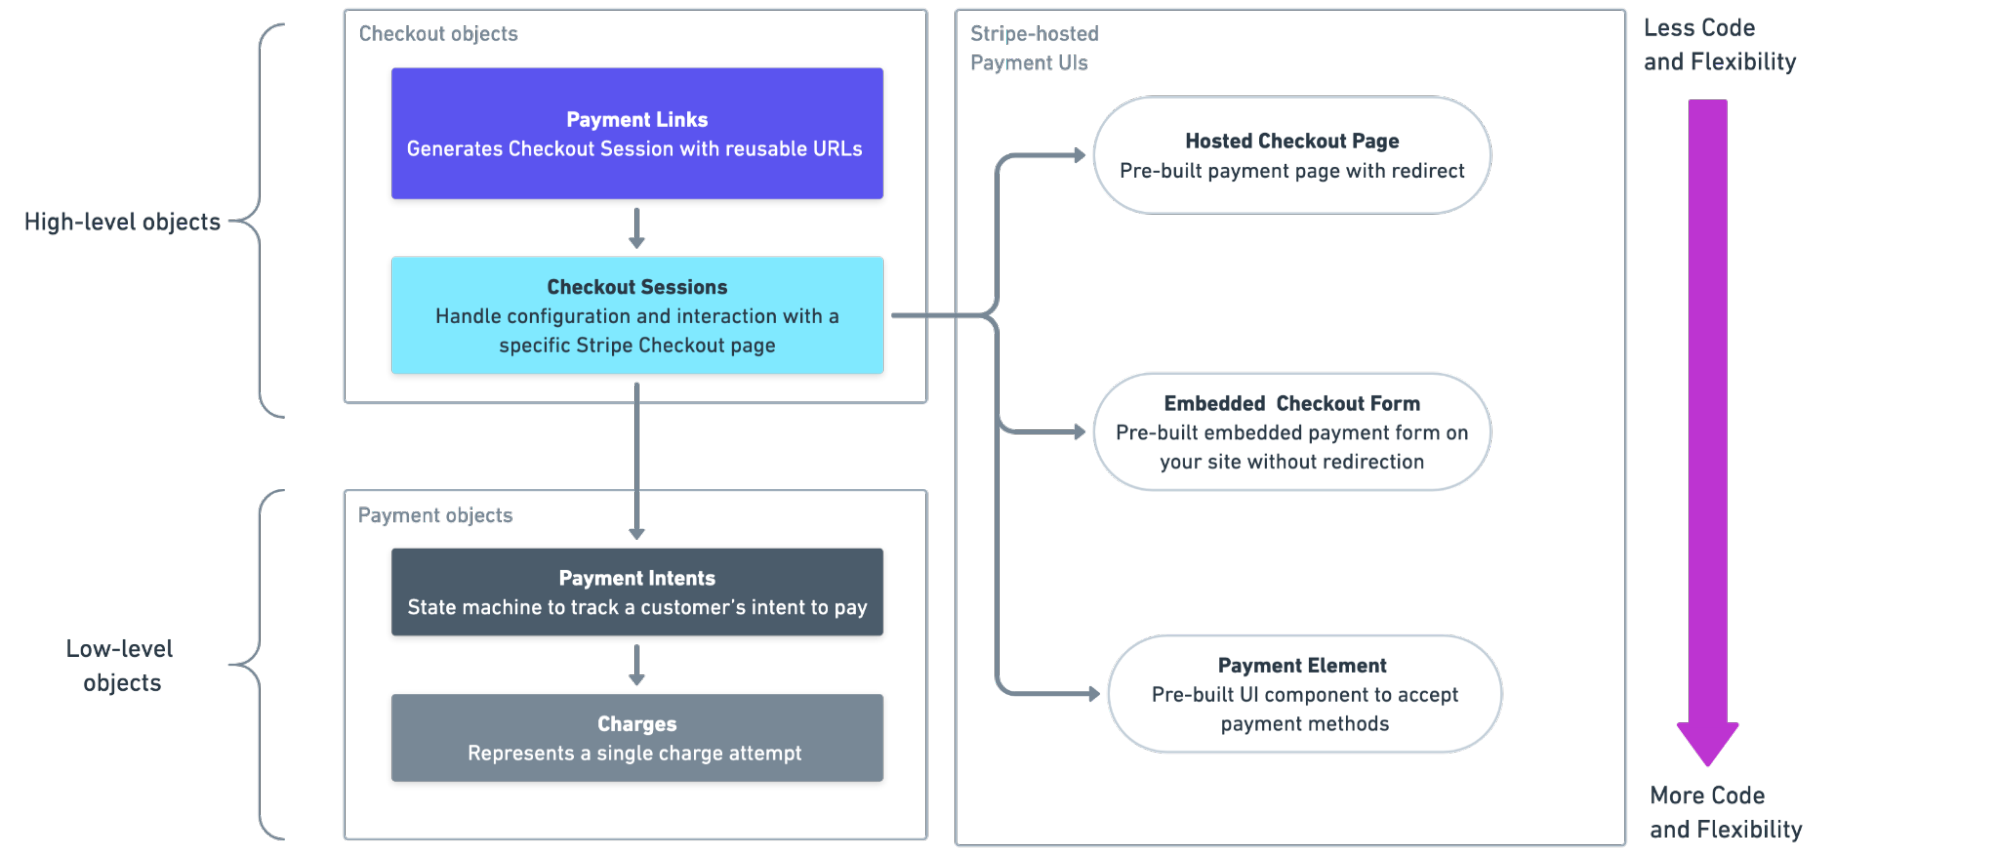
- Checkout Objects (High-Level):
Payment LinkandCheckout Sessionact as orchestration layers. You configure what to sell (line items, prices, tax settings), and Stripe automatically creates and manages the underlying payment objects throughout the entire lifecycle. APayment Linkobject generatesCheckout Sessionobjects each time the shareable URL is opened. - Payment Objects (Low-Level): A
Payment Intentrepresents a single payment attempt and tracks its state from creation through completion. EachPayment Intentcan have multipleChargeobjects representing individual charge attempts (such as retries after authentication).
When you create a Checkout Session, Stripe automatically generates a Payment Intent behind the scenes and manages its entire lifecycle based on your session configuration. This approach means complex commerce logic like automatic sales tax calculation with Stripe Tax, multi-currency support with Adaptive Pricing, subscription billing, and promotional codes is handled through declarative API parameters rather than building logic yourself.
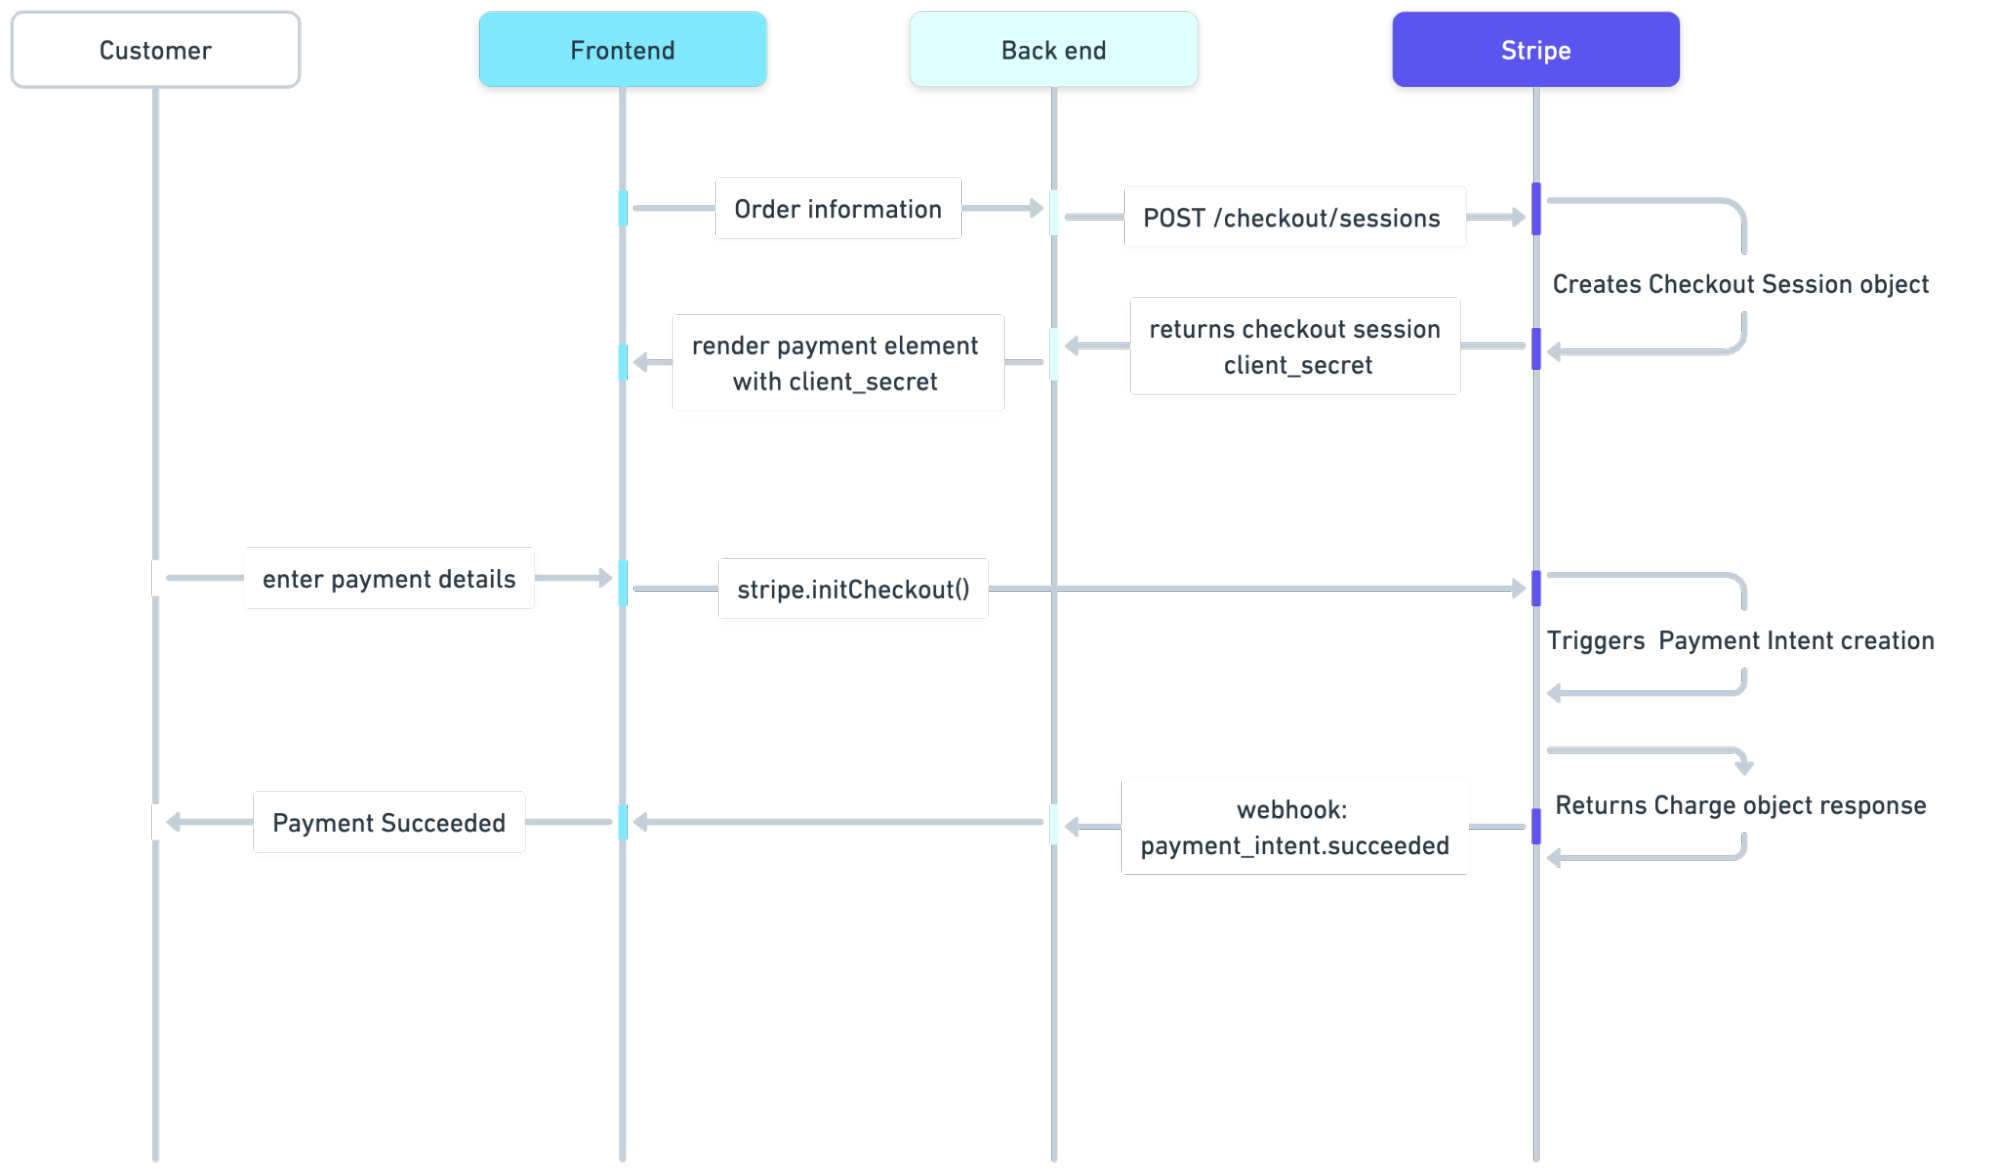
Let’s look at how the Checkout Session integrates with the Payment Element for a one-time payment:
1. Create a Checkout Session
When you call POST /v1/checkout/sessions, you have the option to set parameters to instruct Stripe to handle complex commerce logic. For example, you can set adaptive_pricing: {enabled: true} that automatically localizes the presentment currency for a customer purchasing in another country. The mode parameter dictates whether the payment is a one-time or recurring payment, or for storing a payment method that maps to a Payment Intent, Subscription , or Setup Intent API call. Setting the ui_mode parameter in Checkout Session allows you to integrate with Stripe Element components like the Payment Element and Currency Selector Element directly on your checkout page instead of using a pre-built checkout form. ui_mode supports ‘custom’, ‘hosted’, and ‘embedded’ that allows you to also integrate with Stripe’s redirectable hosted checkout page and embedded checkout form.
You can also use payment_intent_data to set Payment Intent parameters (for example, payment_intent_data.capture_method) to model payment flows like placing a hold on a card to charge later or passing custom metadata, like an internal order ID, directly to the payment record for downstream reporting.
const session = await stripe.checkout.sessions.create({
    return_url:'https://example.com/return?session_id={CHECKOUT_SESSION_ID}',
    ui_mode: 'custom', //Enables embeddable UI components support
    mode: 'payment', //Supports 'payment', 'setup', or 'subscription'
    //Set to true to use Stripe's automated tax calculation
    automatic_tax: { enabled: true },

    //Localizes presentment currency automatically
    adaptive_pricing: { enabled: true },
    line_items: [
        {
          price_data: {
            currency: 'usd',
            unit_amount: 2900,
            product_data: { name: 'Pro Software License' },
          },
          quantity: 1,
        },
      ],

        //Optional: Granular control over the underlying Payment Intent
    payment_intent_data:
        {
          metadata: { order_id: '6789' },
          capture_method: 'automatic', // Or 'manual' to authorize now and capture later
        },
});

//Client Secret passed to frontend to render Payment Element
const clientSecret = session.client_secret;
2. Render embedded elements on your frontend
Pass the client_secret to your frontend to initialize Stripe Elements. The Payment Element automatically displays relevant payment methods based on the customer's location, currency, and transaction details.
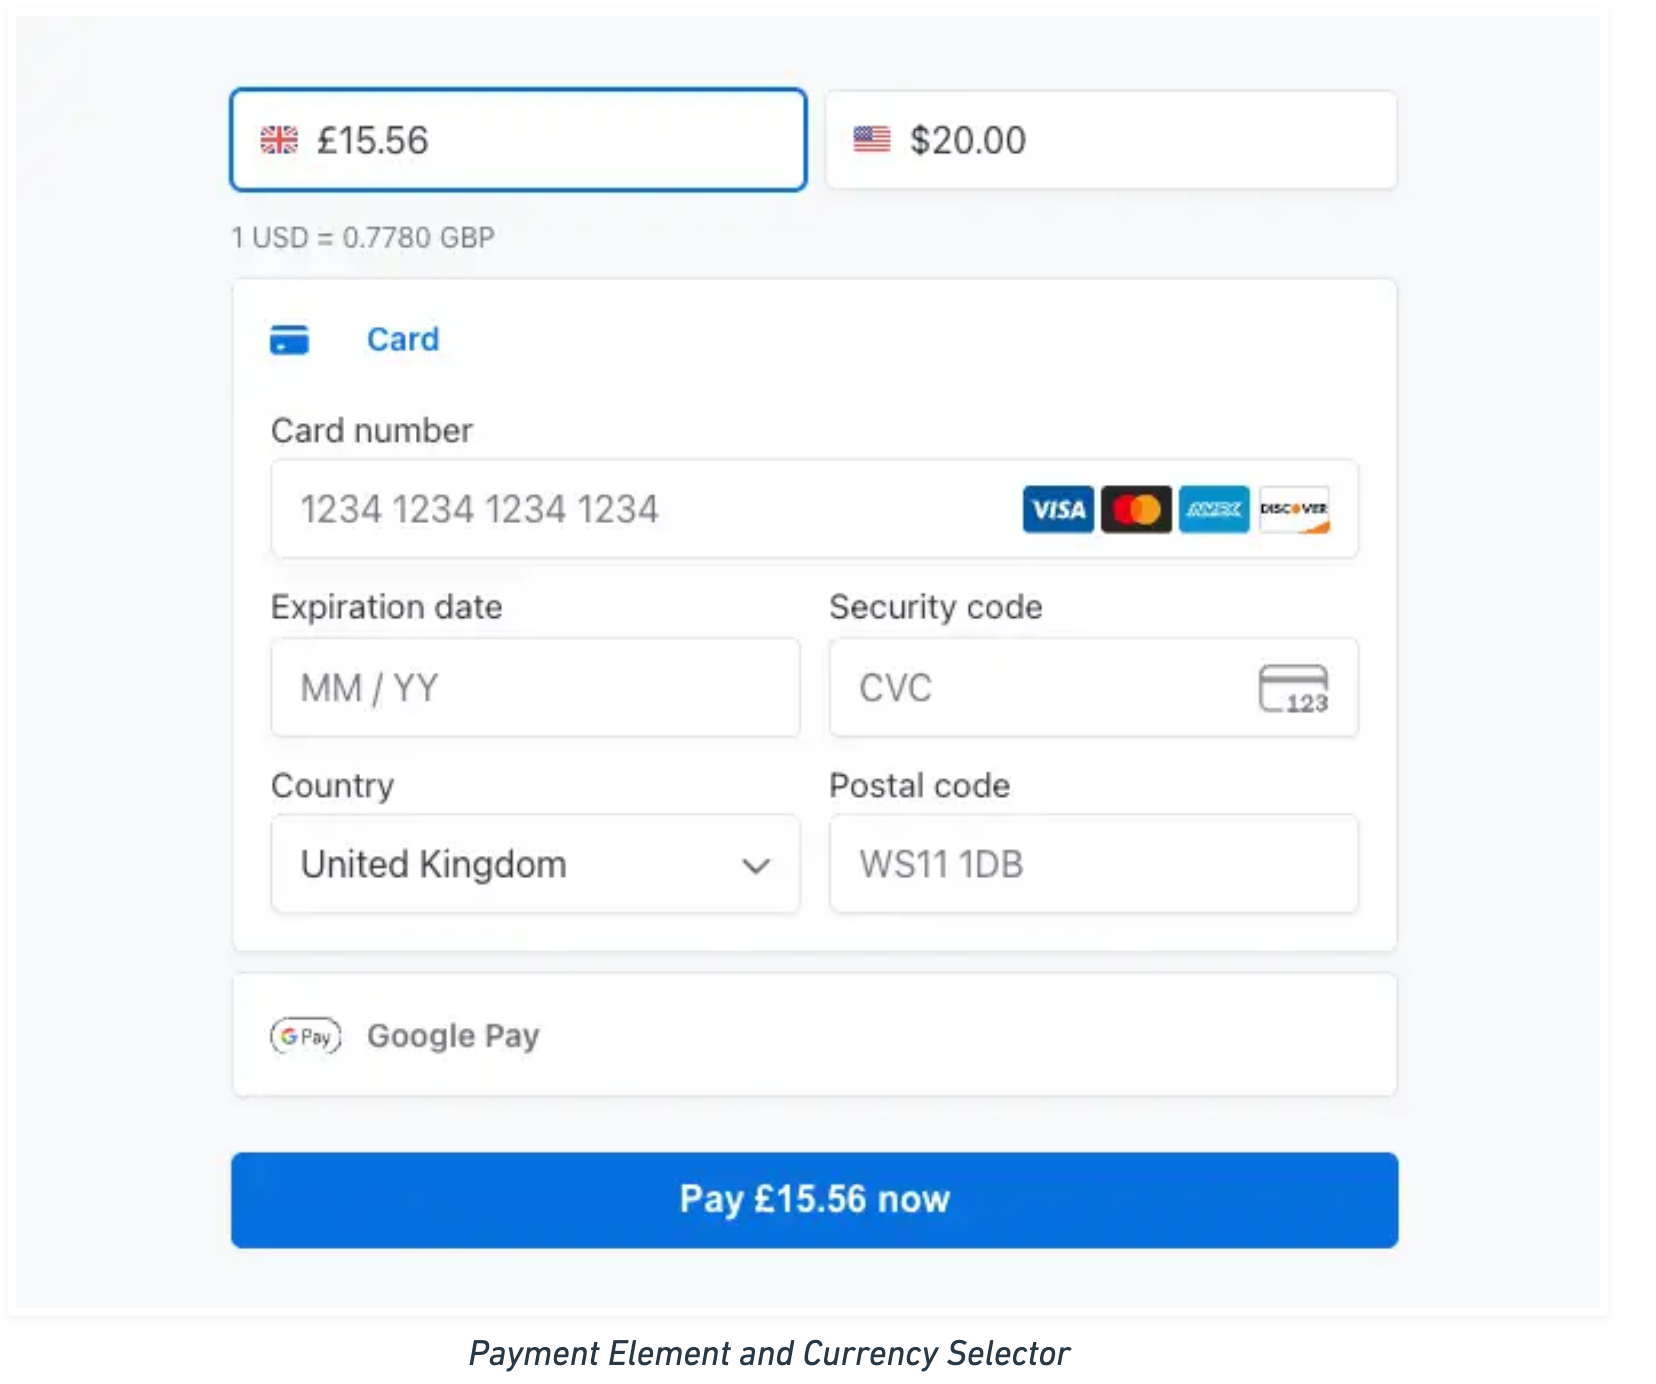
When you include the Currency Selector alongside the Payment Element, customers can choose to pay in their local currency. Stripe detects their location and unlocks relevant, localized payment methods. For example, a customer in the Netherlands sees iDEAL, while a customer in the US sees Credit Cards or Apple Pay, all powered by the same backend session.
// Load Stripe with your publishable key
const stripe = await loadStripe('pk_test_...');

// Initialize Elements with the client secret from your backend
const options = {
  clientSecret: '{{CLIENT_SECRET}}', // Generated by your backend when creating a Checkout Session
};

const elements = stripe.elements(options);

// Create and mount the Currency Selector Element
const currencySelectorElement = elements.create('currencySelector');
currencySelectorElement.mount('#currency-selector');

// Create and mount the Payment Element
const paymentElement = elements.create('payment');
paymentElement.mount('#payment-element');
3. Complete the checkout session
The final step is to submit the payment by calling stripe.initCheckout() with your Payment Element instance. When using the Currency Selector Element, you must also enable Adaptive Pricing in your Stripe Dashboard. When the customer submits the payment, Stripe:
- Confirms the
Payment Intentobject - Automatically handles additional authentication requirements (such as 3D Secure) if required by the customer's bank
- Processes currency conversion when the customer selects a different currency through the Currency Selector
const checkout = stripe.initCheckout({
  clientSecret,
  //Marks your integration ready for Adaptive Pricing
  adaptivePricing: {
    allowed: true
  }
});
Using this higher layer of abstraction lets you easily configure future Stripe features and enables flexible payment flows (like saving payment methods and adding subscription payments) without changing your core API integration.
Going global
While the code example above defines a price of $29.00 USD, your integration is no longer tethered to a single currency. Because you enabled adaptive_pricing, Stripe uses the customer's IP address and browser headers to determine their local context. If a customer in Tokyo visits your checkout:
- Automated Conversion: The Currency Selector detects their location and offers to convert that $29.00 USD into Japanese Yen (JPY) based on real-time exchange rates.
- Localized UI: The Payment Element instantly reorders payment methods, surfacing options popular in Japan, such as Konbini, alongside standard credit cards.
- VAT/Tax: If the customer were instead in Berlin, Stripe Tax (enabled via
automatic_tax) would automatically calculate the correct VAT amount and append it to the line items.
By defining your base currency (USD) and enabling these declarative flags, you’ve effectively launched in multiple markets with no additional backend logic.
When to integrate with Payment Intent directly
The Checkout Session API should be your default starting point. However, use the Payment Intent API directly when your business model requires full control over commerce logic that Checkout Session abstracts away. This typically applies in two scenarios:
-
You need full control over commerce logic and need to manage line items, discounts, and tax calculations yourself. For example, you need an e-commerce cart where users can modify quantities, apply dynamic discounts, or add items after starting checkout.
-
You're building a platform and your own checkout abstraction layer for your customers. For example, if you're building a product like Shopify where your customers embed payments on their sites, you need the flexibility to construct your own checkout abstraction layer.
Start with Checkout Session and migrate only if your business model demands it.
Conclusion
The Checkout Session API with Payment Element integration pattern gives you the best of both worlds: Stripe handles global commerce complexity like tax calculation, currency conversion, and line-item management on the backend while you maintain complete control over your checkout UI.
As your business grows, this pattern scales with you. It keeps the door open for future Stripe features without requiring a total rewrite of your integration. Start with the Checkout Session API to move fast, and only drop down to Payment Intent when your checkout flows require more granular control.
Ready to implement this pattern? Check out the quickstart guide to get started today.